
The Æthernet log of Danimath
Wednesday, September 11, 2013
Thursday, August 29, 2013
Cube4 by freetronics
Finally my birthday present arrived: the Cube4, a 4x4x4 RGB LED cube by freetronics.The assembly was rather simple due to the good instructions an the freetronics site and the detailed video. Because I've been a little impatient, the cube is not 100% rectangular. The first own skteches were no problem. It's a lot of fun to view the colourful cube.
Unfortunatly I cannot upload sketches since yesterday evening. I'm in contact with John from freetronics. So a word concerning the support of freetronics: wonderful! Quick and competent.
If everything will work again, I will post a video.
Unfortunatly I cannot upload sketches since yesterday evening. I'm in contact with John from freetronics. So a word concerning the support of freetronics: wonderful! Quick and competent.
If everything will work again, I will post a video.
Friday, August 9, 2013
So many projects and so few time:
- Steampunk USB hub (with some toys controlled by Arduino)
- Steampunk NAS with Raspi (with some toys)
- North showing hat (Lilipad, compass module, LEDs, hat)
- Evil Spider 3.0 (vibration motor)
- Third and fourth steampunk USB stick
- Dalek
- Lot of stuff to gamble around (TFT, servos, stepper, ...)
Sunday, January 27, 2013
LoL Shield: first own sketch
Next in LoL Shield history: a sort of "growth simulation":
First a short video (sorry for the poor quality - it seems that google reduces quality extremely):
And here is the sketch:
- Place a particle (say: light a LED) at a random place on the shield.
- start a new particle at (0, 0).
- move this particle randomly; north, south, east or west.
- if the particle hits a placed one, fix it at its last free place.
- repeat from 2. until (0, 0) is occupied.
- then blink the result, clear the screen and start at 1.
First a short video (sorry for the poor quality - it seems that google reduces quality extremely):
And here is the sketch:
/* growth01 - simulating a sort of growth. * * 23 Jan 2013 danimath created * **********************************************************************/ #includeboolean used [14][9]; // array of "used" points int x, y; // actual point int xold, yold; // last point const int BLINKNUM = 10; // number of blinks const int BLINKDELAY = 300; // ms; blink speed const int MOVEDELAY = 50; // ms; move speed /* ****************************************************************** */ void setup () { LedSign::Init (); randomSeed (analogRead(0)); for (int j = 0; j < 14; j++) { for (int k = 0; k < 9; k++) { used [j][k] = false; } } x = random (14); y = random (9); LedSign::Set (x, y, 1); used [x][y] = true; x = y = 0; } /* ****************************************************************** */ void loop () { int dir = random (4); /* * 1. light my fire * ================ */ for (int j = 0; j < 14; j++) { for (int k = 0; k < 9; k++) { LedSign::Set (j, k, used [j][k]); } } /* * 2. get next point * ================= */ xold = x; yold = y; switch (dir) { case 0: x--; if (x < 0) x = 13; break; case 1: x++; if (x > 13) x = 0; break; case 2: y--; if (y < 0) y = 8; break; case 3: y++; if (y > 8) y = 0; break; } /* * 3. check, if used * ================= */ if (used [x][y]) { used [xold][yold] = true; for (int j = 0; j < BLINKNUM; j++) { LedSign::Set (0, 0, 0); LedSign::Set (xold, yold, 0); delay (MOVEDELAY); LedSign::Set (0, 0, 1); LedSign::Set (xold, yold, 1); delay (MOVEDELAY); } x = y = 0; } LedSign::Set (x, y, 1); delay (MOVEDELAY); /* * 4. nothing more possible * ======================== */ if (used [0][0]) { /* * 4.1. blink result * ----------------- */ for (int i = 0; i < BLINKNUM; i++) { LedSign::Clear (0); delay (BLINKDELAY); for (int j = 0; j < 14; j++) { for (int k = 0; k < 9; k++) { LedSign::Set (j, k, used [j][k]); } } delay (3 * BLINKDELAY); } /* * 4.2. clear all * -------------- */ for (int j = 0; j < 14; j++) { for (int k = 0; k < 9; k++) { used [j][k] = false; } } x = random (14); y = random (9); LedSign::Set (x, y, 1); used [x][y] = true; x = y = 0; } }
LoL Shield assembly
For a long time I'm addicted to blinking LEDs, so it was only natural to buy a LoL Shield by Jimmie P. Rogers. I ordered it at Watterott and - as usual - they delivered very quickly. With trembling hands I unpacked the parts - and decided to wait until tremor disappeared. After reading some descriptions of the assembly and watching this recommendable video from Super Awesome Sylvia. I started to solder the 126 LEDs; a good exercise.
Unfortunately all instructions handle 3 mm LEDs; and there is a pitfall with 5 mm LEDs:
the instructions recommend to solder the headers last, and so did I. But two headers (for the digital pins) have to be soldered between the LEDs:


This was a little bit difficult. Thus I recommend to solder the inner headers first and work with the LEDs from this point. Finally solder the headers at the edge (the analogue ones).
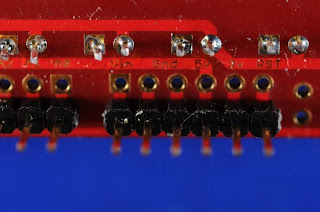
Finally I noticed that the solder joints were so high, that they contacted the USB port of the Arduino, so I used a proto shield as a spacer.

Here is a view of the result:

Next I started the example sketches. They worked rather good, but I had some "ghost LEDs" when LED 42 was lit. I suspected a cold soldering spot, so I re-soldered the LED. Everything was fine - for five minutes, then the ghost LEDs reappeared. Fortunately there were six spare LEDs, and I replaced LED 42. Then everything worked fine.
Next I tried the fonttest example, but this did not work. It seems that there is a bug in the library, so that it does not work wit IDE 1.0.1. Lots of research to do.
Tuesday, November 6, 2012
The second steampunk inspired USB stick
Now it's time for the second USB stick to be changed into a steampunk stick:

A close-up of the cooling system:

The back side:

A close-up of the little foot:

And finally the stick at work:

The glass lens is a light blue one, but the red LED of the stick is strong enough to outshine this.

A close-up of the cooling system:

The back side:

A close-up of the little foot:

And finally the stick at work:

The glass lens is a light blue one, but the red LED of the stick is strong enough to outshine this.
Wednesday, October 3, 2012
Steampunk inspired USB stick, continued
The first version looked a little bit simple to me; and it rolled every now and then over the desk. So there had to be installed some additions:

This is the result. The pipes are needed, because due to the incredible information density of my documents the stick got too hot ;-)))


And here are some details:


This is the result. The pipes are needed, because due to the incredible information density of my documents the stick got too hot ;-)))


And here are some details:


Subscribe to:
Posts (Atom)